Quick start
This page covers a whole deployment, from scanning the site to robots running their missions. Each stage gives who does it, the steps in order, what to expect, and how you know it is done. Every step links to the page that covers it in full.
| Stage | Who | Done when |
|---|---|---|
| 1 · Scan the site | Whoever captures the site | You have the exported .pcd, below 200 MB |
| 2 · Build the map | Anyone can author it. Pushing needs an Admin | The site has a new draft revision |
| 3 · Put the map live | Admin. An Operator can catch a robot up | Each robot runs the activated map, is localised, and reaches the points you send it to |
| 4 · Set up the work | Admin. An Operator can set run conditions, switch missions on and send them | The robot's mission list reads robot confirmed |
| 5 · Run the robots | Operator | Ongoing |
Admin on this page means a Site Admin for that site or a Tenant Administrator. Roles defines every role.
Before you start
- Weston Robot sets up your tenant, sites and robots. We provision the sites, register the robots, and deliver each robot with its network configured. Contact us to add a site or a robot.
- Someone needs to be an Admin at the site. Pushing, publishing and activating a map all need it. A Tenant Administrator creates users and grants roles.
- Use a desktop or laptop browser. Both toolboxes are built for it, and the Robot Deployment Toolbox expects a mouse.
- Read the safety guides before anyone works near a moving robot: Operational Safety and Quadruped safety.
1 · Scan the site
Who: Whoever captures the site. No role in the Robot Management Toolbox is needed.
You need: A charged Pocket2, a phone running MindCloud Go, a desktop running MindCloud Studio with its per-machine licence, and a USB 3.0 data cable. What you need
Full guide: Manifold Scanner Guides
-
Before the visit: charge the scanner, install both apps, and get the MindCloud Studio licence.
-
Connect: join the phone to the scanner's own Wi-Fi, then turn on Connect Device in MindCloud Go. Connection
-
Start: tap Start Scan, name the project, and set the NTRIP and Panorama toggles if required. They cannot be turned on once the scan is running. Creating the project
-
Initialise: set the scanner down flat and level, and leave it alone until the point cloud appears. Initialisation
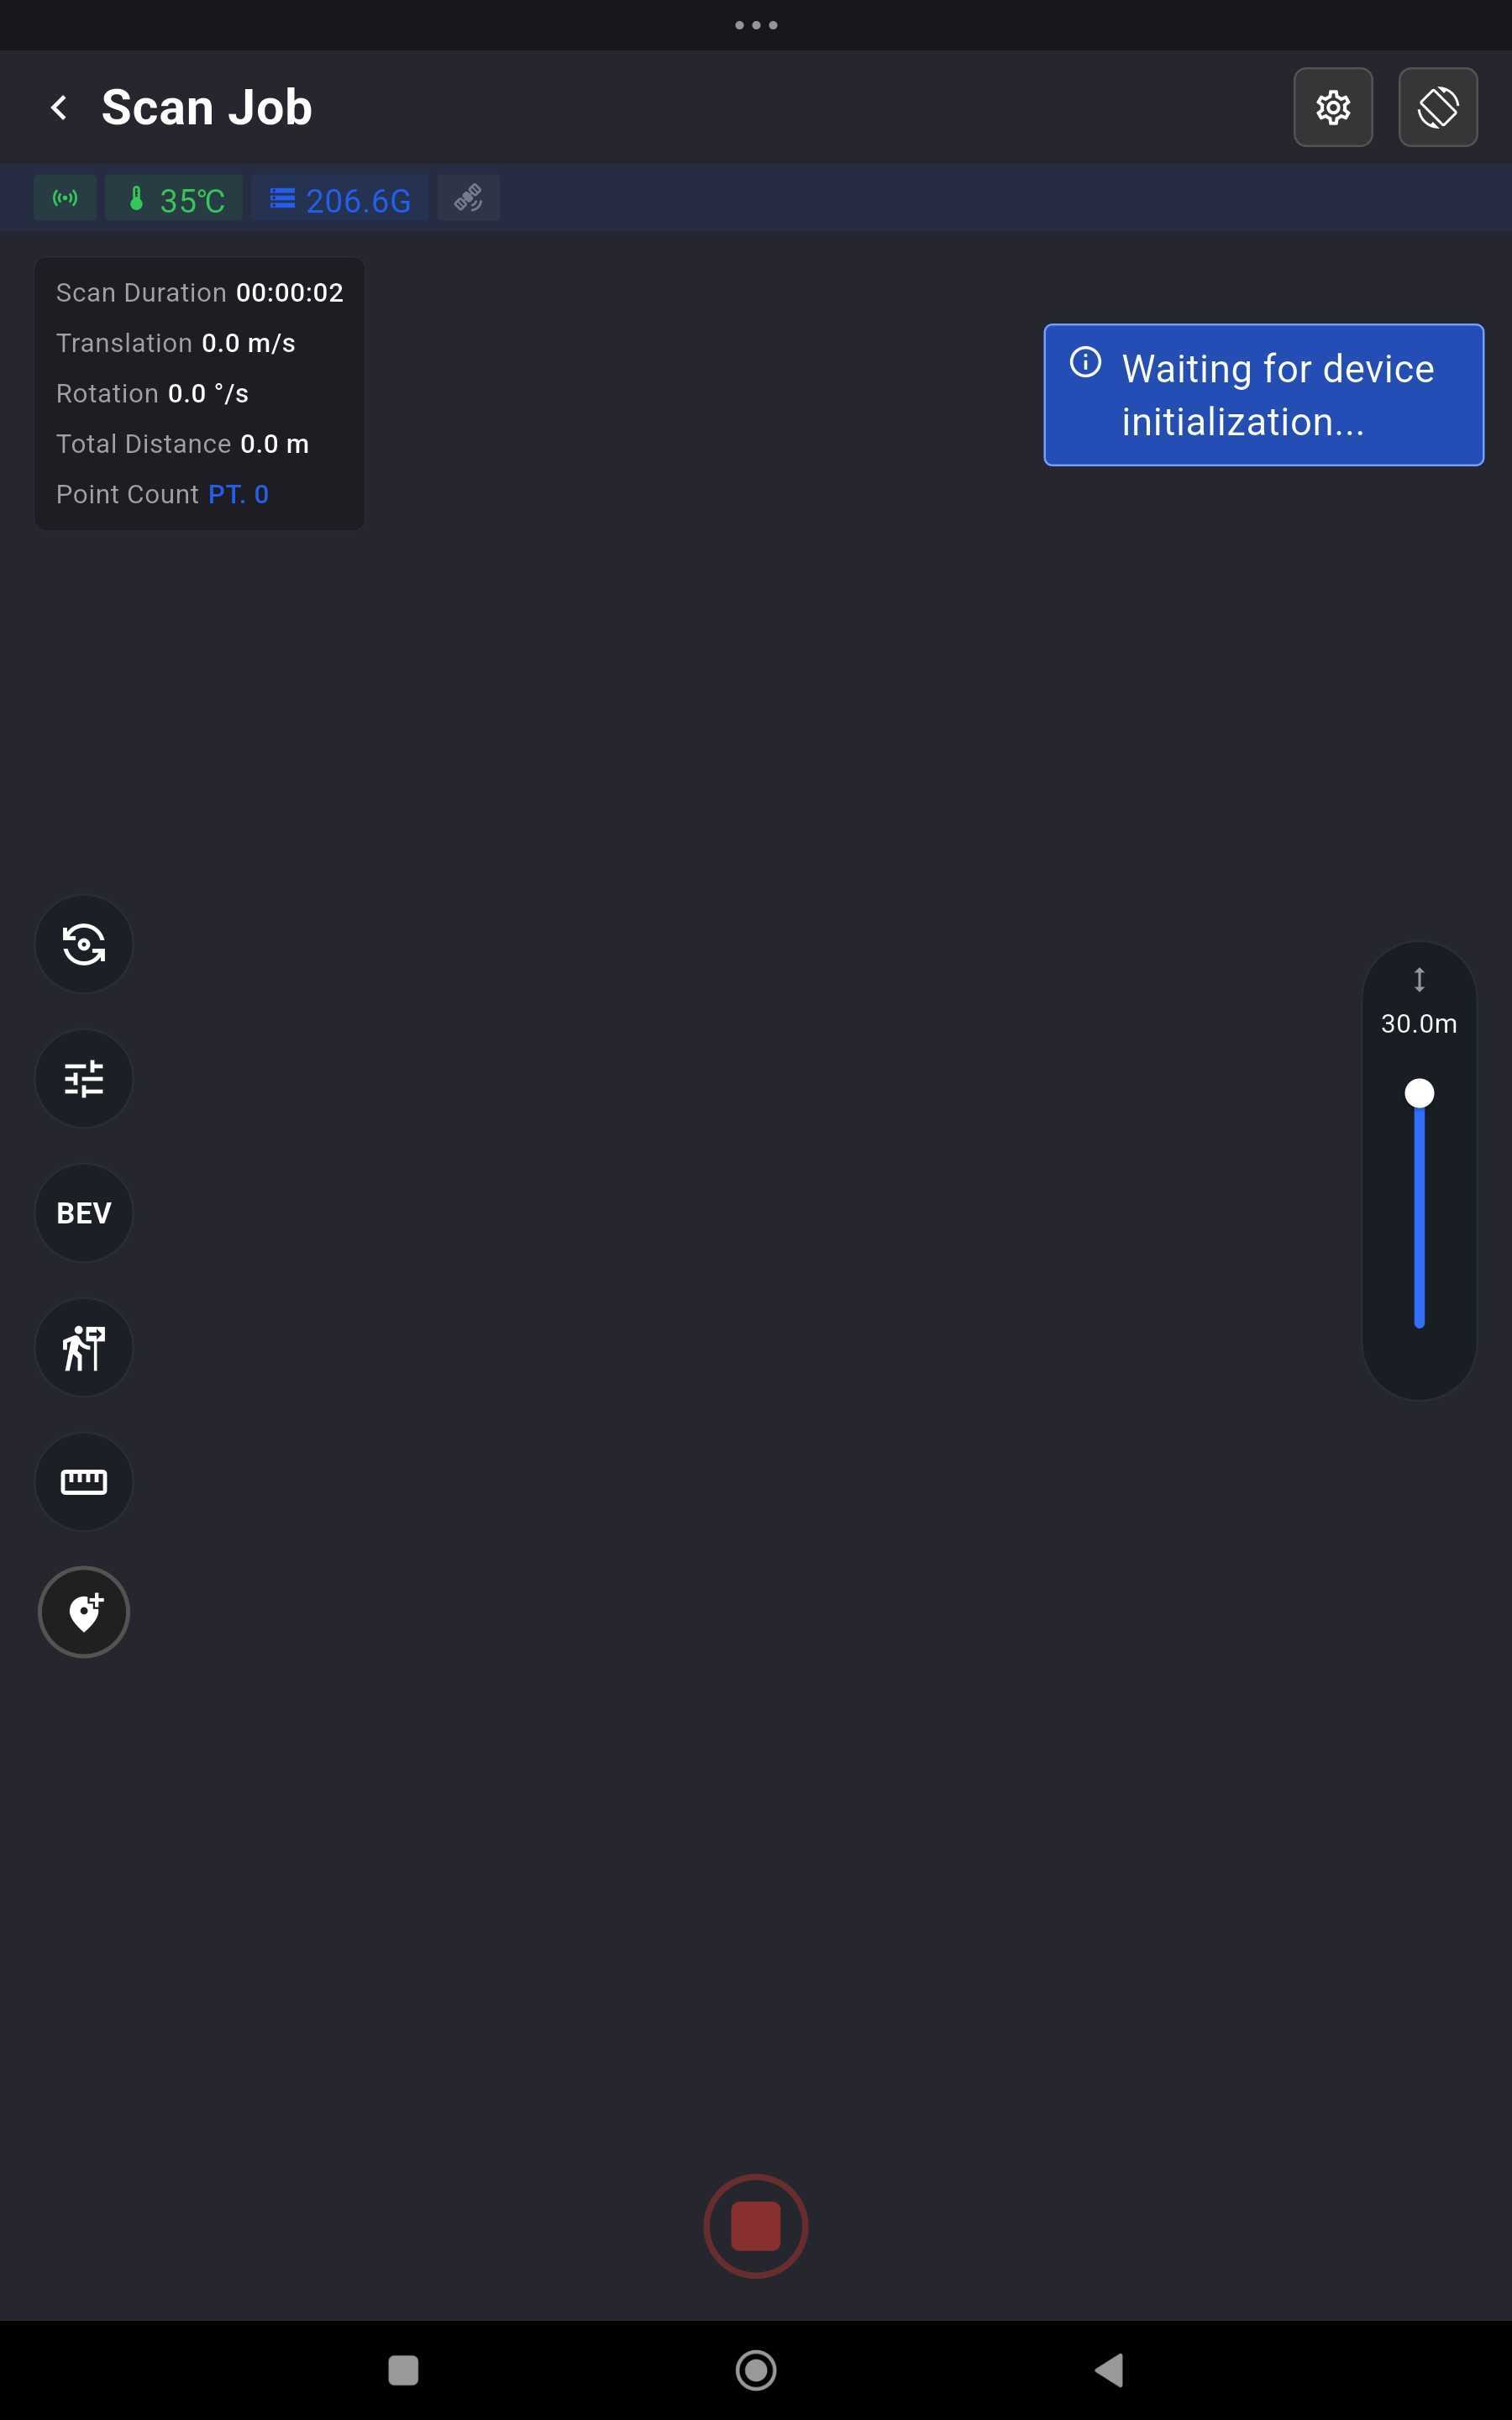
Still initialising: the blue banner is showing and Point Count is 0. Pick the scanner up once the banner clears and the preview fills with points. -
Walk the site at a controlled pace, on a route that crosses back over itself. Walking the site
-
Stop: check the preview for gaps, tap stop, and wait for Project saved as …. Stopping
-
Copy and load: copy the whole project folder off the scanner over rear Port C, and load the
.lxin MindCloud Studio with File ▸ New Task. Processing -
Export: check the cloud, apply Subsample ▸ Spatial ▸ 0.1 m, then export it as Point Cloud Library cloud (
*.pcd) in Binary, namedpointcloud_map.pcd. Exporting the.pcd
What to expect
- The scan is recorded on the scanner, not on the phone. While the phone is on the scanner's Wi-Fi it has no internet, and only one phone can connect at a time.
- Losing the phone does not stop the scan, and only the phone that started it can stop it. Rejoin the Wi-Fi with that phone, then stop.
- Processing is slow and CPU-heavy. Run it on a computer you can leave busy.
- Re-scan while you are still on site if the preview looks tilted, warped or doubled, has sections floating apart, or has gaps where you walked. Judging a scan
You have pointcloud_map.pcd, exported in Binary and below 200 MB, from a cloud you
checked in MindCloud Studio.
2 · Build the map
Who: Anyone can author a map, because it stays in their browser. Importing a site's map needs Observer or above at that site. Pushing needs an Admin.
Where: The Map editor in the Robot Deployment Toolbox.
- Load: choose Start from local files and load
pointcloud_map.pcd. If the site already has a map, use Import from Fleet instead. Load Map Data - Prepare: downsample the cloud, gravity-align it so the floor sits flat, and crop what the map does not need. Prepare Data
- Levels: run Extract and add the plane that is the floor, or use + Manual if it is not listed. Then generate its occupancy map at about robot height. Setup Levels
- Edit: place nodes (waypoints, and a charging node where the robot charges), join them with segments, and draw zones where the robot must not go. Give the nodes names. Edit Map
- Check routes: in the Map inspector, test that the routes that matter can be solved. Testing that a route solves
- Export and push: read the validation warnings, write the changelog, then push to the fleet. Choose the site, add the revision to the existing map if the site has one, and write a change summary that says what changed. Export · Pushing to the fleet
What to expect
- Your work is saved in the browser, but the point cloud is not. When you reopen a map later, you load the cloud again. Reopening a map
- Keep the whole bundle below 300 MB. It goes over Wi-Fi to every robot that works the site.
- Clean validation means the map is consistent with itself. It does not mean the map matches the building. Only driving a robot on it, in stage 3, shows that.
- More than one detected level does not mean more than one floor. The supported model is one deployment level on one physical floor. Floors and elevations
- A push does not change anything on a robot. It creates a draft revision, and robots keep their current map until that revision is published and activated.
The push succeeds, and the site has a new draft revision in the Robot Management Toolbox.
3 · Put the map live
Who: An Admin publishes, activates and assigns maps. Catching a robot up can also be done by an Operator.
Where: The Robot Management Toolbox, on the site's own page. A site's maps
-
Publish, then activate: under the site's Maps, choose Publish on the draft revision, then Activate. How a map reaches a robot
-
Assign the map to each robot: in the site's Robots list, Assign Map sets which map a robot runs. How a robot is assigned a map
-
Catch each robot up: choose Take control & update on the robot's own view. An Admin can also choose Approve apply beside the robot's Map status in the site's Robots list, or Approve map updates (N) for every robot waiting. Wait for the robot to confirm the new map. If the update fails, retry it from the same place. Catching a robot up to the map
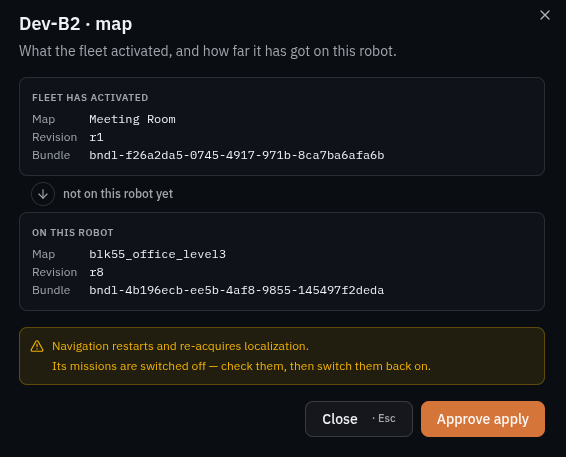
The map comparison, opened from Map status: what the fleet activated, and what is on the robot. Approve apply starts the update. -
Check that it is localised: the navigation map's header should read Localized, and the robot should show as a blue arrow where it really is, pointing the way it faces. If the header reads Not Localized, use Init Pose: click where the robot really is and drag the way it faces, as closely as you can judge. A see-through green arrow shows the pose while you drag. Once the robot takes it, the blue arrow moves there. The panels
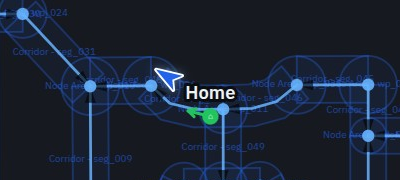
The robot is the blue arrow, pointing the way it faces. -
Test it by driving: send the robot to a few points across the site with Quick Dispatch, and watch it arrive at each one. The map is validated by driving on it
What to expect
- One Admin can take a map from draft to live. If your process needs a second person to approve a map, that check has to happen outside the system.
- Updating a robot's map restarts its navigation and pauses auto-dispatch. The robot has to localise again before it can work, and nothing starts on its schedule until auto-dispatch is resumed in stage 4. Do not update a robot in the middle of a task.
- A robot that is behind cannot be dispatched. Dispatch and Go Home are unavailable until it confirms the new map. Its missions are switched off in the toolbox, and the copies the robot holds are cleared when its map is updated. downloaded, not applied means it is still running the old map.
- A robot that already has saved locations cannot be given work until an Admin confirms each one against the new map. A robot with no saved locations yet has nothing to confirm. After a map change
- After each Quick Dispatch, the robot takes no new work until you acknowledge the result. Recovery and acknowledgement
- The first activation on a new site is a test, not a delivery. If the robot cannot localise, drifts off segments or fails to reach nodes, go back to stage 2. If the scan itself is the problem, go back to stage 1.
Each robot runs the activated revision, reads Localized, and reaches the points you send it to.
4 · Set up the work
Who: Saved locations and missions need an Admin. Run conditions, switching missions on and off, sending and resuming auto-dispatch can also be done by an Operator.
Where: The Robot Management Toolbox. Mission editing and dispatch
- Save the places the work uses, and set each robot's home: choose Set Home on the control panel and click the map, or choose Set home on a saved location. Saved locations
- Build each mission in the Mission Editor: name it, choose patrol or errand, then add checkpoints and the actions at each one. The editor
- Give each mission a run condition. A mission without one cannot be activated or sent. Run conditions
- Activate the missions, then choose Send to Robot. On the mission list the button reads Send active set to robot, and it sends every active mission at once. Check that the badge beside it reads robot confirmed. Sending missions to a robot
- Resume auto-dispatch: on the robot's Missions tab, choose Resume Auto-Dispatch. A map update leaves auto-dispatch paused, so expect it to be paused after stage 3, and scheduled missions do not start until it is resumed. Auto-dispatch
- Give your team their roles. This needs a Tenant Administrator. Creating users and granting roles
What to expect
- An active mission is not necessarily on the robot. Activating makes a mission eligible to run, and Send to Robot puts it on the robot. To see what the robot has, read on robot on the mission's row and the badge beside the send button, not the activation.
- Times are in the robot's local time, not the browser's.
- Moving a saved location does not by itself update a robot that already holds the mission. The mission is badged location changed until you choose Send to Robot again.
Every mission each robot should run reads active and on robot, the badge beside the send button reads robot confirmed, and auto-dispatch is running.
5 · Run the robots
Who: An Operator. An Observer can watch, and can use the E-Stop.
Where: The Dashboard in the Robot Management Toolbox, then each robot's own view. Robot dashboard
- Open the Dashboard and look for anything that needs attention.
- Open the robot in question.
- Let the schedule run, or start something yourself: run a saved mission now with Dispatch, or send the robot to one point with Quick Dispatch.
- Watch it. To step in while a mission is running, stop the run or use the E-Stop. Go Home is refused until the run has ended. Taking control
- When a run fails, acknowledge it, then check that auto-dispatch is running again. Recovery and acknowledgement
- Review what the robots found. Detection review
What to expect
- Only one person can command a robot at a time, because commanding it means holding its controls. The E-Stop is the exception: anyone with a role at the site can press it, and an Operator resets it. Taking control
- After Go Home, watch where the robot is, not what the panel says. The panel can still say the work is staged while the robot is already driving home.
- After a failed run, the robot takes no new work until you acknowledge it. A failed scheduled mission also does not restart its schedule by itself.
- If the robot loses its link to the fleet, you lose the live view and cannot send commands. What the robot does then is set when Weston Robot commissions it. What happens during a mission
When something is not right
| You see | What to check |
|---|---|
| A robot is idle when it should be working | Resume Auto-Dispatch: auto-dispatch may be paused. Auto-dispatch |
| Dispatch and Go Home are unavailable | The E-Stop is active, the robot is behind the activated map, or its saved locations still need confirming. Taking control · Catching a robot up · After a map change |
| This robot's map changed on the robot's view | Its saved locations need an Admin to confirm them. After a map change |
| Not Localized in the navigation map's header | Init Pose. The panels |
| Go Home reads Set Home | No home is set for this robot. Saved locations |
| The badge beside the send button ends in · needs review | The map has changed under the mission, so check the mission against the map now activated. Sending missions to a robot |
| An action is refused | When an action cannot proceed |
When the site changes
You come back to the map when the building changes: racking is added, a wall is moved, or a door is closed for good.
If only a saved location has moved, an Admin moves the location in the Robot Management Toolbox, and no new map is needed. Then choose Send to Robot once: it sends every active mission and clears location changed. Saved locations
If the building has changed:
- Import from Fleet in the Map editor, rather than reusing an old copy, and make the change. Only one person should edit a site's map at a time, because neither would see the other's changes. If the scan no longer matches the building, scan again, then load the new cloud together with the existing map under Start from local files. Load Map Data
- Push the revision to the existing map, so the site keeps one history, with a change summary that says what moved. What the push asks for
- Publish it, then activate it at a time when the robots can stop and restart their navigation. You can push as soon as the work is done. What activation costs a robot
- Catch each robot up. Catching a robot up to the map
- Confirm its saved locations: an Admin chooses Confirm pose on each one, or moves it to where it belongs. Until every location is confirmed, the robot cannot be given work. After a map change
- Switch its missions back on, choose Send to Robot, and check that the badge beside it reads robot confirmed. Sending missions to a robot
- Resume auto-dispatch, which the map update left paused. Auto-dispatch
Support
Before raising a ticket, note which stage you were at, which site is involved, and which robot or map. Before you contact us lists what helps.